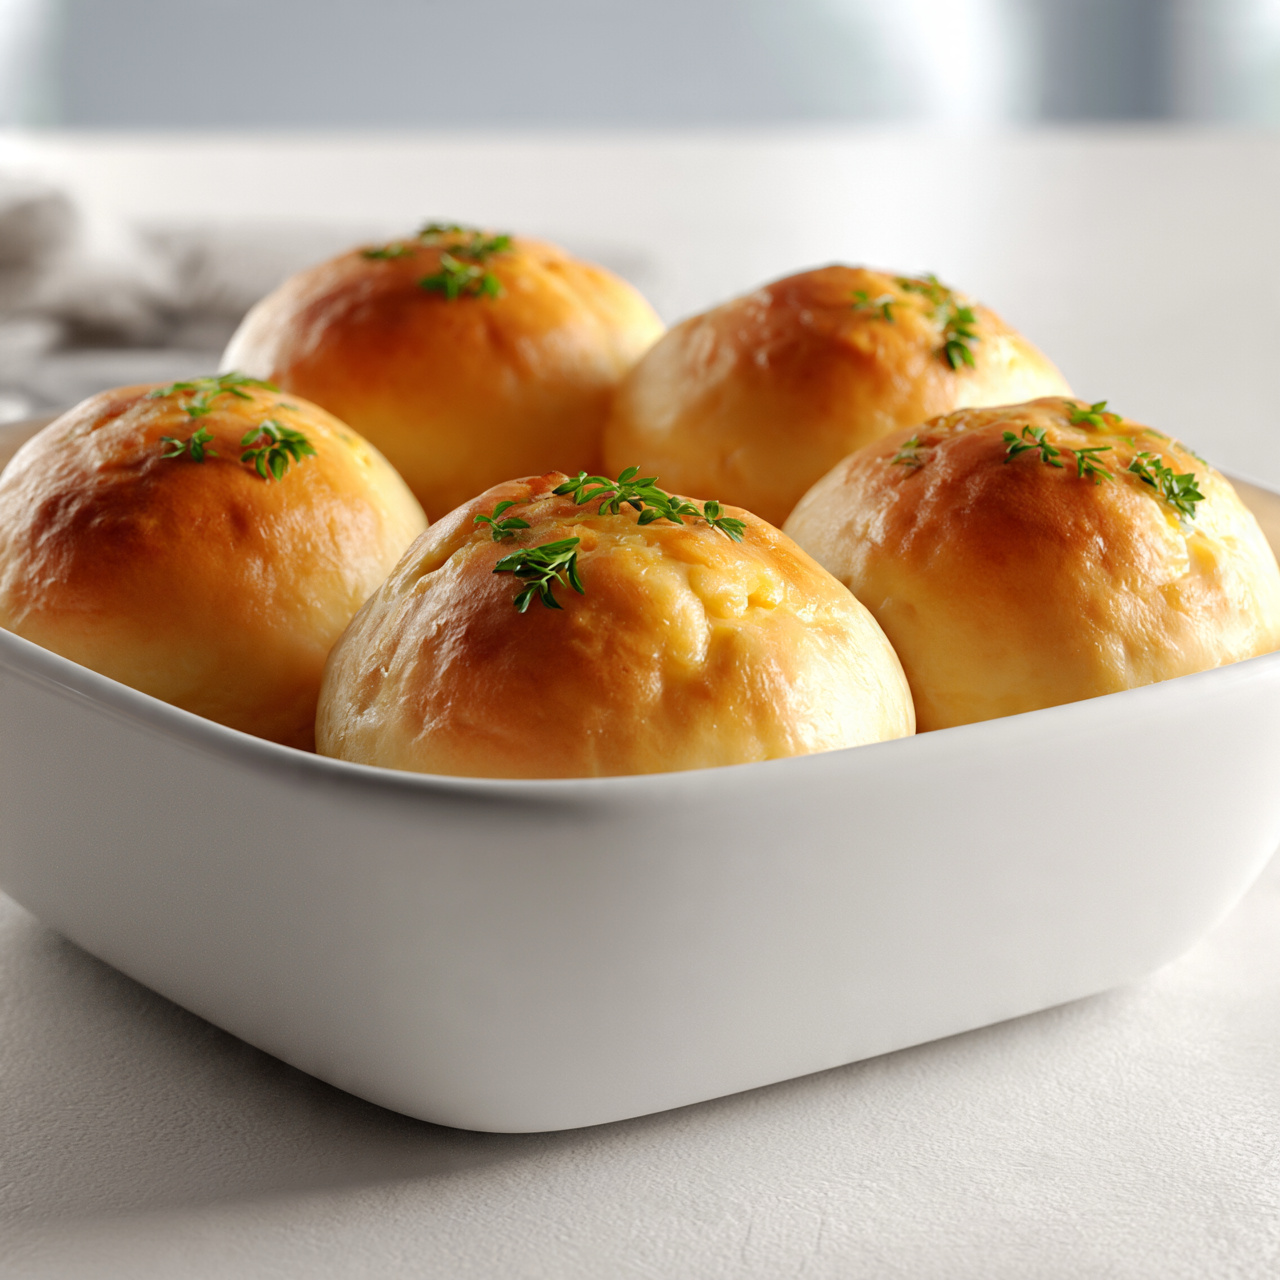
Filipino Spanish Bread: Soft, Buttery Rolls with Sweet Filling
Filipino Spanish Bread is a beloved bakery classic, featuring pillowy soft rolls filled with a rich, buttery sugar mixture and rolled in toasted breadcrumbs. This easy Spanish bread recipe brings the taste of your favorite panaderya straight to your home kitchen.

The Filipino Bakery Classic You Can Finally Make at Home
If you grew up anywhere near a Filipino panaderya, the smell of freshly baked Spanish bread is probably seared into your memory. Golden on the outside, cloud-soft on the inside, with a warm ribbon of buttery brown sugar filling in every bite. This is one of those recipes that feels like a hug.
The Filipino Spanish bread recipe has nothing to do with Spain despite its name. It is a homegrown Filipino bakery staple, sitting shoulder to shoulder with ensaymada and pan de sal in the morning bread basket. Locals sometimes call it Señorita Bread, and the Senorita bread recipe follows the same basic blueprint: a milk-enriched dough, a sweetened butter filling, and a generous coat of breadcrumbs that toast beautifully in the oven.
Once you crack this Spanish bread Filipino recipe, you will never need to hunt for a bakery again.
Why This Recipe Works
A lot of home bakers struggle with bread doughs feeling dense or dry. The secret here is a soft, slightly enriched dough made with whole milk, butter, and egg. This combination keeps the crumb tender long after the rolls cool down, which is exactly what makes store-bought Spanish rolls so irresistible.
The filling is dead simple: softened butter, brown sugar, and a splash of cream. Spread it thin, roll it tight, and the sugar caramelizes slightly during baking into something almost toffee-like inside each roll.
Getting the breadcrumb coating right also matters more than most recipes admit. Fine, dry breadcrumbs stick better and create that signature slightly crisp exterior without overwhelming the soft dough underneath.
Having the right tools makes this Spanish bread making guide so much easier to follow at home. A stand mixer cuts your kneading time in half, and a reliable kitchen scale helps you portion evenly so all your rolls bake at the same rate.
Tips for Perfect Filipino Spanish Bread Every Time
Before you dive into the Spanish bread Filipino baking process, keep these pointers close:
- Do not rush the rise. A full 60-minute first proof gives the dough structure and flavor. A cold kitchen? Pop the dough in an oven with just the light on.
- Keep your filling soft but not melted. Butter that is too warm will leak during rolling. Room temperature is the sweet spot.
- Roll firmly but gently. Tight rolling keeps the filling inside, but aggressive handling tears the dough. Find the middle ground.
- Watch the oven clock. These rolls bake fast. Fifteen minutes can be enough. Pull them when golden, not deep brown.
Baker's Tip: For extra indulgent Spanish bread filling, add a teaspoon of condensed milk to the butter-sugar mixture. It makes the filling slightly stickier and even more caramel-flavored once baked.
The Story Behind the Name
The term Spanish bread in Filipino baking is a bit of a delicious mystery. Most food historians agree the name stuck from the Spanish colonial era, when European bread-making techniques were adapted by Filipino bakers into something entirely their own. What emerged were Spanish bread names like Señorita Bread and Pan de Kastila, each with regional twists on the same buttery theme.
Today, this bread shows up at every Filipino breakfast table, merienda spread, and family gathering. It pairs perfectly with a hot cup of coffee or a cold glass of milk, and it disappears just as fast as it comes out of the oven.
If you have been searching for Spanish bread baking ideas beyond the classic version, try swapping the brown sugar filling for ube halaya, or mix in a bit of grated cheese for a salty-sweet spin that is pure Filipino comfort food.
Ready to bake a batch of these soft, golden rolls from scratch? Here is the complete recipe:
Filipino Spanish Bread: Soft, Buttery Rolls with Sweet Filling
Filipino Spanish Bread is a beloved bakery classic, featuring pillowy soft rolls filled with a rich, buttery sugar mixture and rolled in toasted breadcrumbs. This easy Spanish bread recipe brings the taste of your favorite panaderya straight to your home kitchen.
Ingredients
- 3 cups all-purpose flour, plus extra for dusting
- 2 1/4 tsp instant dry yeast, one standard packet
- 1/4 cup granulated sugar, for the dough
- 3/4 tsp salt
- 3/4 cup whole milk, warmed to about 110 degrees F
- 1 large egg, room temperature
- 3 tbsp unsalted butter, softened, for the dough
- 1/2 cup unsalted butter, softened, for the filling
- 1/2 cup brown sugar, packed, for the filling
- 1/2 cup fine breadcrumbs, for rolling, toasted if preferred
- 2 tbsp all-purpose cream or heavy cream, optional, makes filling creamier
Instruction
In a small bowl, combine the warm milk, 1 teaspoon of the granulated sugar, and the instant yeast. Stir gently and let it sit for 5 to 10 minutes until foamy. If it does not foam, your yeast may be expired.
In a large mixing bowl, whisk together the flour, remaining granulated sugar, and salt. Make a well in the center and add the yeast mixture, egg, and softened butter.
Mix everything together with a wooden spoon or a stand mixer fitted with the dough hook until a shaggy dough forms. Knead by hand for 8 to 10 minutes, or with the mixer on medium speed for 6 minutes, until the dough is smooth, soft, and slightly tacky but not sticky.
Shape the dough into a ball and place it in a lightly oiled bowl. Cover with plastic wrap or a clean kitchen towel and let it rise in a warm spot for 1 hour, or until doubled in size.
While the dough rises, make the filling. Beat the softened butter and brown sugar together until light and creamy. Add the cream if using and mix until smooth. Set aside at room temperature.
Once the dough has risen, punch it down gently and turn it out onto a lightly floured surface. Divide it into 16 equal pieces, about 45 grams each if you have a kitchen scale.
Working with one piece at a time, flatten the dough into a rough oval or triangle shape using your hands or a rolling pin, about 4 to 5 inches long.
Spread about 1 heaping teaspoon of the butter-sugar filling across the surface of the dough, leaving a small border at one edge.
Roll the dough tightly from the wide end toward the narrow tip, like a mini crescent or cigar roll, pinching the seam lightly to seal.
Pour the breadcrumbs onto a shallow plate. Gently roll each filled dough log in the breadcrumbs, pressing lightly so they adhere to all sides.
Arrange the rolls seam-side down on a parchment-lined baking sheet, spaced about 2 inches apart. Cover loosely and let them proof for another 30 to 45 minutes until puffed.
Preheat your oven to 350 degrees F (175 degrees C) while the rolls are proofing.
Bake for 15 to 18 minutes, until the tops are lightly golden and the rolls feel set. Avoid overbaking as these are meant to stay soft and tender.
Remove from the oven and let cool for at least 10 minutes before serving. The filling will be very hot right out of the oven.
Equipment
- Stand mixer with dough hook (or large mixing bowl for hand kneading)
- Small bowl (for yeast activation)
- Rolling pin
- Parchment-lined baking sheet
- Pastry brush (optional)
- Kitchen scale (optional, for portioning)
- Shallow plate (for breadcrumbs)
Notes
Serving, Storing, and Variations
Spanish bread is best eaten warm, within an hour or two of baking, when the filling is still slightly gooey and the breadcrumb crust has that light, toasty bite. Serve them on a wooden board with a pot of coffee for a proper Filipino breakfast experience.
Storing leftovers: Keep rolls in an airtight container at room temperature for up to 2 days. They also freeze beautifully for up to a month. Reheat from frozen in a 300-degree oven for about 8 minutes.
Variations worth trying:
- Ube Spanish Bread: Replace the brown sugar filling with ube halaya for a purple, earthy-sweet version.
- Cheese-Filled Spanish Roll: Add a thin strip of quick-melt cheese alongside the butter filling for that salty contrast Filipinos love.
- Cinnamon Sugar Version: Swap the brown sugar for a cinnamon-sugar blend to give these rolls a slightly different spiced warmth.
However you fill them, the pillowy dough and crumb-coated crust remain the soul of this timeless Spanish bread recipe. Once you make them at home, you will understand exactly why Filipino bakeries can never seem to keep them in stock.