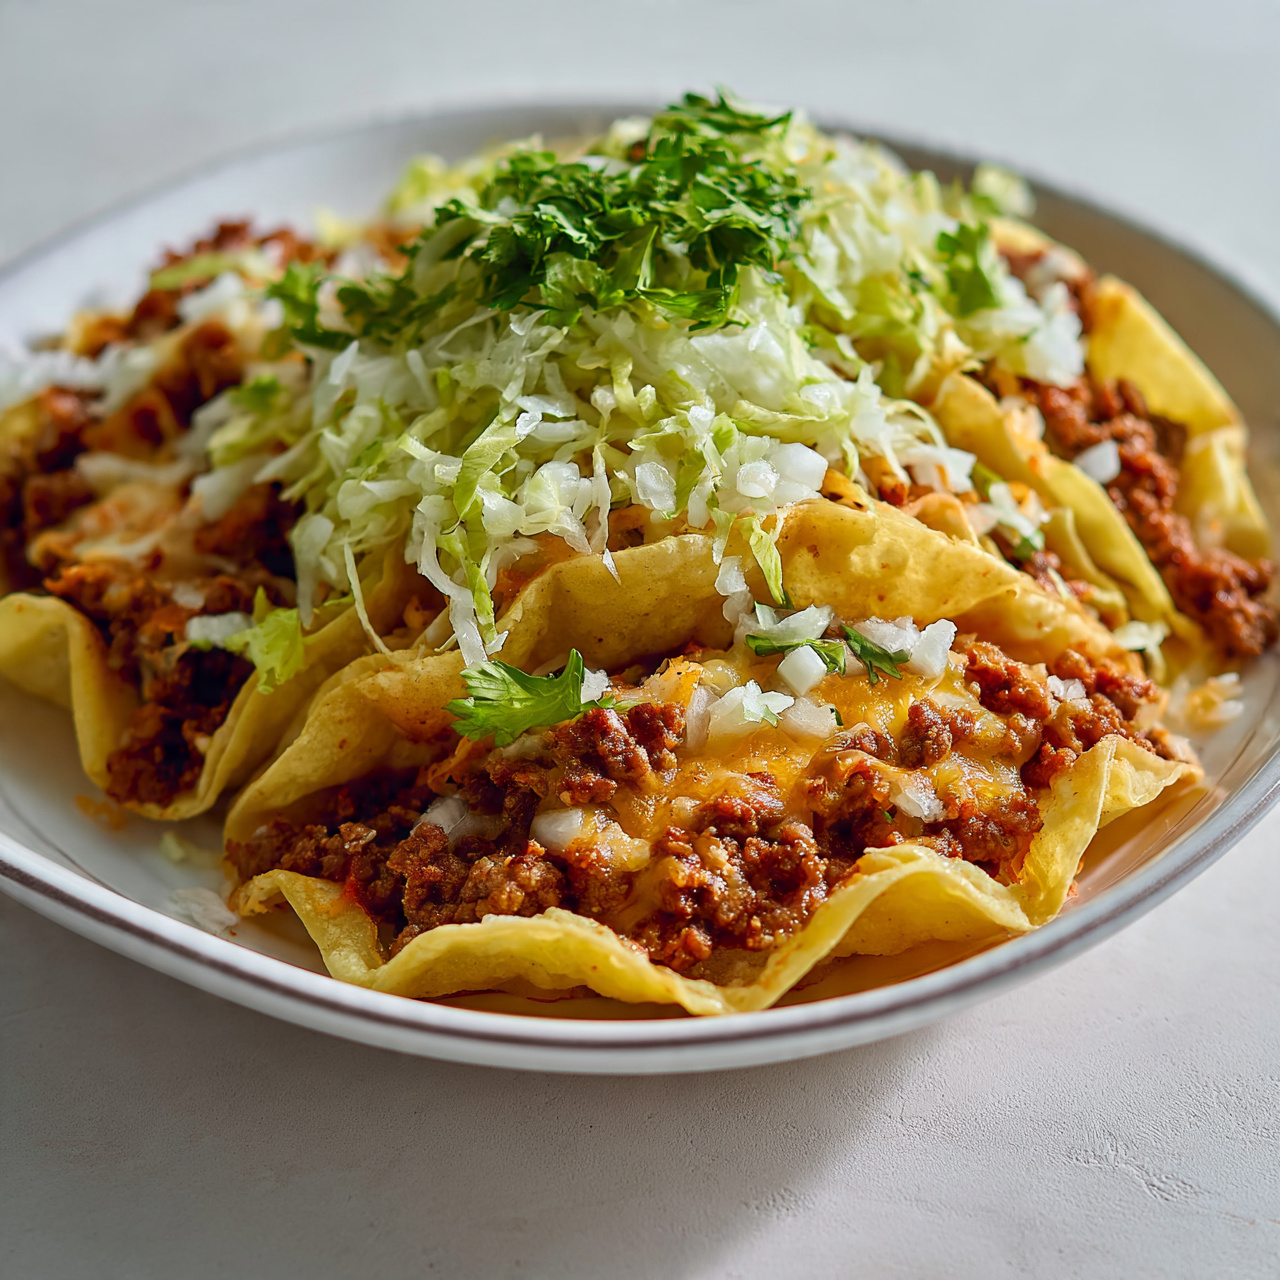
Crispy Baked Ground Beef Tacos
These Crispy Baked Ground Beef Tacos deliver crunchy shells, juicy seasoned beef, and melted cheese in every bite. An easy weeknight dinner the whole family will beg for again and again.

The Crispy Baked Ground Beef Tacos That Will Replace Taco Tuesday Forever
If you have ever bitten into a taco only to have the shell collapse into a pile of fillings, this recipe is about to change everything. These Crispy Baked Ground Beef Tacos go into the oven on a sheet pan, and what comes out is nothing short of magical: shatteringly crunchy shells, bubbling melted cheese, and deeply seasoned beef in every single bite. No more soggy bottoms, no more floppy shells, no more assembly-line chaos at the dinner table.
This is one of those easy beef recipes for dinner that earns a permanent spot in your weeknight rotation. It takes about 15 minutes of hands-on prep, uses ingredients you probably already have, and feeds a family of four with zero complaints.
Why Baking Your Tacos Is a Game-Changer
Most people build tacos cold and serve them at room temperature, which means the cheese never fully melts and the shells stay exactly as they came out of the box. Baking flips the script entirely.
When you load the shells and slide them into a hot oven, a few things happen at once. The cheese melts down into the meat, almost sealing it in place. The shells toast and crisp all the way through, not just on the outside. And everything gets hot at the same time, so you are not rushing to assemble while the beef gets cold.
It is the same principle that makes rotisserie chicken tacos so satisfying when done this way. The oven does the heavy lifting.
Chef's Tip: Stand-up flat-bottom taco shells are your best friend here. They sit upright on the baking sheet without any balancing act, and they crisp up more evenly than curved shells. Look for them near the regular taco shells at most grocery stores.
The Secret to Incredible Taco Meat
Great crispy beef starts with great taco meat, and great taco meat comes down to three things: the right fat ratio, proper browning, and a seasoning that actually clings.
For ground beef tacos, an 80/20 blend is ideal. The extra fat carries flavor and keeps the meat juicy through the bake. Lean beef tends to dry out and can taste a little flat once it comes out of the oven.
Do not rush the browning step. Let the beef sit undisturbed for a minute or two before breaking it apart. That contact with the hot pan builds the kind of deep, savory crust that makes tacos beef taste like something from your favorite restaurant.
Once the seasoning goes in, let it simmer with a splash of water until the liquid is almost completely gone. You want the meat coated and glossy, not wet. Wet meat leads to soggy shells, and soggy shells are the enemy.
Tools and Ingredients Worth Using
The right setup makes this recipe effortless. A heavy rimmed baking sheet keeps the shells stable and promotes even browning. A quality taco seasoning, whether store-bought or your own blend, makes a real difference in the depth of flavor you get from simple dinner with ground beef.
How to Build the Tacos Before Baking
Here is a tip that most taco meat recipes skip: before you add the beef, spread a thin layer of refried beans inside each shell. It sounds subtle, but it acts as a moisture barrier and keeps the bottom crisp. It also adds a creamy, savory layer that makes every bite more complex.
Fill each shell about two-thirds full with meat, then pile on the cheese. Make sure the cheese reaches the edges of the shell. During baking, it will melt and sort of laminate everything together.
A few things to remember:
- Do not overfill the shells or they will tip and spill in the oven
- Use shredded cheese rather than slices for even melting
- A light spray of cooking oil on the outside of the shells gives them an extra golden color
Chef's Tip: For an extra crispy finish, switch your oven to broil for the last 60 to 90 seconds. Watch them closely because the line between perfect and burned is very thin at broil temperature.
Easy Variations to Try
Once you have the method down, beef recipes easy variations are endless.
- Rotisserie Chicken Tacos: Swap the beef for shredded rotisserie chicken tossed with taco seasoning and a splash of broth. Same oven temp, same time.
- Cheesy Double Beef: Mix a spoonful of cream cheese into the taco meat before filling for a richer, creamier interior.
- Spicy Version: Add a diced chipotle pepper in adobo sauce to the meat while it cooks for a smoky kick.
- Tex-Mex Style: Stir a handful of drained black beans and frozen corn into the beef mixture before filling.
These are among the most flexible beef recipes for dinner you will find anywhere.
Ready to make the crunchiest, cheesiest tacos of your life? Here is the full recipe:
Crispy Baked Ground Beef Tacos
These Crispy Baked Ground Beef Tacos deliver crunchy shells, juicy seasoned beef, and melted cheese in every bite. An easy weeknight dinner the whole family will beg for again and again.
Ingredients
- 1 lb ground beef, 80/20 blend for best flavor
- 12 stand-up taco shells, flat-bottom style holds fillings better
- 1 1/2 cups shredded Mexican blend cheese, divided
- 2 tbsp taco seasoning, store-bought or homemade
- 1/4 cup water
- 1/2 yellow onion, finely diced
- 3 garlic cloves, minced
- 1 tbsp olive oil
- 1/2 cup refried beans, optional but highly recommended for structure
- 1 cup shredded lettuce, for topping
- 1/2 cup sour cream, for topping
- 1/2 cup fresh salsa or pico de gallo, for topping
- 2 tbsp fresh cilantro, roughly chopped, optional
- 1 lime, cut into wedges for serving
Instruction
Preheat your oven to 425 degrees F (220 degrees C). Line a large rimmed baking sheet with foil and lightly coat with cooking spray.
Heat the olive oil in a large skillet over medium-high heat. Add the diced onion and cook for 3 to 4 minutes until softened. Add the minced garlic and cook for 30 seconds more until fragrant.
Add the ground beef to the skillet and break it apart with a wooden spoon. Cook for 6 to 8 minutes until no pink remains. Drain any excess fat.
Stir in the taco seasoning and water. Simmer for 2 to 3 minutes until the liquid is mostly absorbed and the meat is glossy and coated. Remove from heat.
If using refried beans, spread a thin layer inside each taco shell before filling. This acts as a glue and prevents the shell from getting soggy.
Stand the taco shells upright on the prepared baking sheet. Spoon the seasoned ground beef evenly into each shell, filling about two-thirds of the way.
Top each taco generously with shredded cheese, making sure to cover the meat all the way to the edges of the shell.
Bake for 10 to 12 minutes until the shells are deep golden brown and crispy and the cheese is fully melted and starting to bubble.
Remove from the oven and let cool for 2 minutes. Top with shredded lettuce, sour cream, pico de gallo, cilantro, and a squeeze of fresh lime. Serve immediately.
Equipment
- Large rimmed baking sheet
- Aluminum foil
- Large skillet
- Wooden spoon or spatula
- Colander or paper towels for draining beef
- Spoon for filling shells
Notes
Serving, Storing, and Making It Ahead
Serve these tacos straight from the oven with all your favorite toppings on the side so everyone can customize. Shredded lettuce, sour cream, fresh pico de gallo, sliced avocado, pickled jalapeños, and a squeeze of lime are all excellent choices.
For storage, keep the taco meat separate from the shells. Refrigerate the meat in an airtight container for up to 4 days. When you are ready for round two, reheat the meat in a skillet, load fresh shells, and bake again. The shells only need about 8 minutes the second time since the meat is already cooked.
You can also freeze the seasoned beef for up to 2 months, which makes this one of the most practical beef dinner options for busy weeks. Pull it from the freezer the night before, thaw in the fridge, and you are 20 minutes from dinner.
Whether you are cooking for picky kids, feeding a crowd, or just looking for a new spin on a weeknight classic, these crispy baked ground beef tacos deliver every single time.